Hi All,
As With Release of New Version of Microsoft Dynamics NAV 2016, we also need to look into possibility of Upgrade Our Customer Base to it.

In this article I will share my experience from a Mock Migration From 2013 R2 To NAV 2016.
So if something that you would be interested in Reading Please go Ahead.
Read Already Published Article About NAV 2016 Here.
1. From which version we can upgrade directly to Microsoft Dynamics NAV 2016 -
So as of today Microsoft Support Upgrade to Microsoft Dynamics NAV 2016 from below listed Versions -
- NAV 2013.
- NAV 2013 R2.
- NAV 2015.
2. What About Customized Reports?
Customized Reports as per one of my Mock Migration, Reports works seamlessly without any issues.
** Considering Reports does not contain code related to Discontinued / Re-engineered Process Like Approvals.
3. What are my Pre-requisites Before Starting Data Migration To Dynamics NAV 2016?
Sr. No.
|
Prerequisites
|
1
|
Upgrade Toolkit Objects.
|
2
|
A Merged Object File that is Created After Compare and Merge Process.
|
3
|
Microsoft Dynamics NAV 2016 Partner license.
|
4. Steps Before Starting Data Migration
Sr. No.
|
Steps Before We Start Data Migration.
|
1
|
Make a copy of the old database or create full database backup.
|
2
|
If a company name includes a special character, an error may display during the upgrade. In this context, special characters include the following:
[ ~ @ # $ % & * ( ) . ! % - + / = ? ] |
3
|
If you are going to upgrade a database where one or more company name includes a special character, Microsoft recommend that you rename the company before you start the upgrade process. After the upgrade is successfully finished, you can rename the company again.
|
4
|
In Object Designer, verify that no objects are locked.
|
5
|
On the Tools menu, choose Build Server Application Objects, and then choose the Yes button.
|
6
|
Upload the Microsoft Dynamics NAV 2016 Partner license to the database.
|
7
|
If you are converting a Microsoft Dynamics NAV 2013 R2 or Microsoft Dynamics NAV 2015 database, then run the Sync-NavTenant cmdlet from the Microsoft Dynamics NAV 2013 R2 or Microsoft Dynamics NAV 2015 Administration Shell to synchronize the database schema changes.
|
8
|
Stop Navision Service If any pointing to Database and close all sessions.
|
9
|
Clear all Microsoft Dynamics NAV Server instance records from the dbo.Server Instance table in the database on SQL Server.
|
5. Data Migration (As per MSDN on 22-10-2015)
** Steps Highlighted in Red, seems incorrect to Me and I have added some suggestions based on my experience.
** Hope Microsoft will update the MSDN Article.
Sr. No.
|
Data Migration Steps From Microsoft
|
Correction
|
1
|
Create a full SQL backup of the old database on SQL Server.
|
|
2
|
Upload the Microsoft Dynamics NAV 2016 license to the old database.
|
|
3
|
Delete all objects from the old database.
|
Do Not Do This Step
|
In the development environment version that matches the database, open the old database, open Object Designer, and then delete all objects.
|
Do Not Do This Step
|
|
** New
|
Delete All Objects Except Tables From the old Database.
|
Updated on 30-11-2015
|
4
|
Uninstall the old product (NAV 2013, NAV 2013 R2, NAV 2015) and install the new product
|
|
5
|
Convert the old database to a Microsoft Dynamics NAV 2016 format.
RUN NAV 2016 Dev Environment as administrator. |
|
6
|
Connect a Microsoft Dynamics NAV 2016 Server instance to the converted database.
|
|
Increase the SQL Command Timeout setting for the Microsoft Dynamics NAV Server instance.
|
Remember To Do It
|
|
**New
|
Compile System Tables With – With Validation Options. (2000000004..2000000166)
|
Not Suggested By Microsoft.
|
7
|
Run the schema synchronization to complete the database conversion
|
|
From the development environment:
Open development environment as an administrator. On the Tools menu, choose Sync. Schema For All Tables, and then choose With Validation and follow the schema synchronization instructions. From the Microsoft Dynamics NAV 2016 Administration Shell: Open the Microsoft Dynamics NAV 2016 Administration Shell as an administrator, and then run Sync-NavTenant cmdlet as follows: Sync-NavTenant –ServerInstance <ServerInstanceName> *Replace <ServerInstanceName> with the name of the Microsoft Dynamics NAV Server instance that is connected to the database. |
||
8
|
Import the application objects to the converted database.
|
|
When you import the FOB file, if you experience metadata conflicts, use the Import Worksheet to handle these conflicts.
Finally, on the dialog box for selecting the schema synchronization, set the Synchronize Schema option to Later. |
||
9
|
Import the Upgrade Toolkit Objects with Synchronize Schema option to Later.
|
Remember To Do It.
|
10
|
Run the schema synchronization to synchronize the new tables
|
|
11
|
Run the Sync. Schema For All Tables – With Validation option from the development environment
OR Run the Sync-NavTenant cmdlet from the Microsoft Dynamics NAV 2016 Administration Shell. |
|
12
|
Run the data upgrade process.
|
|
From Tools -> Data Upgrade -> Start The Upgrade Process.
|
||
13
|
If you want to skip company initialization, then use powershell as below Start- NavDataUpgrade cmdlet and set the SkipCompanyIntitialization parameter.
Start-NavDataUpgrade -ServerInstance <ServerInstanceName> -Force |
Remebere To Do It, If you have any Customization in Codeunit 2 Like Confirm Window.
|
14
|
Delete the upgrade objects
When you delete tables, on the Delete dialog box, set the Synchronize Schema option to Force. |
|
15
|
Import upgraded permission sets and permissions by using the Roles and Permissions XMLports
|
|
16
|
Set the language of the customer database
|
|
17
|
Add new control add-ins
|
|
18
|
Import Payment Services and Data Encryption Key (Optional)
|
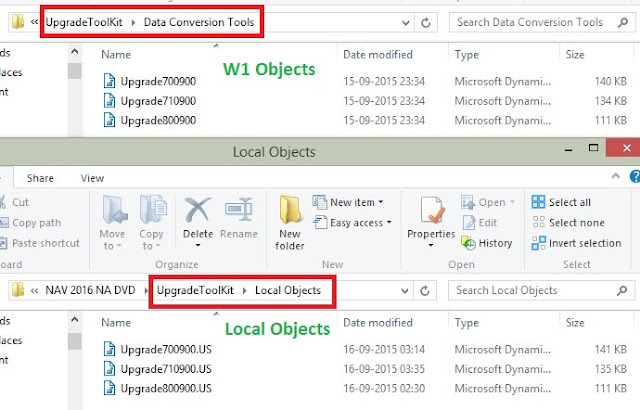
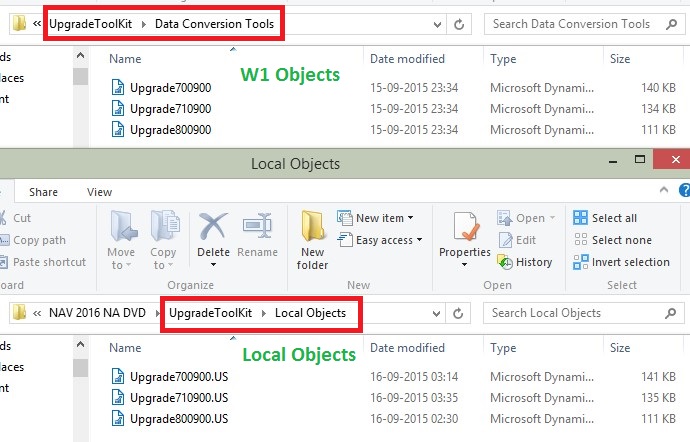
6. Where I Find the Upgrade Toolkit?
Upgrade Toolkit for all Three Supported Versions is available with Product DVD. Select W1 or Localized Toolkit From the Product DVD as shown below.
7. Shall we Do regular Upgrade?
As we are discussing from one month, there are so many new features about how we should write code and what I feel that we should follow what Microsoft Says about customization.
- Use Events& Subscription.
- Remove Un-used Customization and Map to Standard as WorkFlow.
- If something applies to most of the customer prepare a .navx extension and keep a safe copy.
- If you are a vertical owner follow the guild lines for Documentation for vertical.
With all this you can reduce the Future Upgrade Cost of the Customer and will reduce the Cost of Applying cumulative updates on Customer Database.
But its a Organizational Decision how they want to go ahead. If you still want to follow the old approach then its your call. For Object Merging (if following Old Approach) Use Powershell cmdlets for auto merge.
MSDN Articles for Data Migration to Microsoft Dynamics NAV 2016 -
Your Comments and Views about article and Upgrade Approach are awaited. Do Suggest Your Views.
Regards,
Saurav Dhyani
Comments
Post a Comment